Layout Template Help
Here is a quick run down of our Layout Templates
Our layout templates are designed for placement purposes only and are highly recommended when creating artwork for products that fold or die cut such as door hangers or presentation folders. Open the appropriate template depending on your design program. Layout templates are 1 inch larger than finished size to allow for instructions.
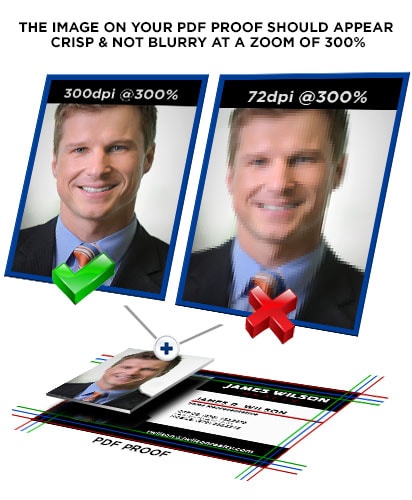
Please make sure to preview your proof after upload. A Zoom of 300% will give you a good idea of how clear/crisp an image will appear when printed.
BLEED LINE
Setting up any type of print file is fairly easy, however it illustration below. Any files sent in at 72 DPI will be rejected and could cause delay.
TRIM LINE
Setting up any type of print file is fairly easy, however it illustration below. Any files sent in at 72 DPI will be rejected and could cause delay.
CAUTION LINE
Setting up any type of print file is fairly easy, however it illustration below. Any files sent in at 72 DPI will be rejected and could cause delay.
FILE RESOLUTION
Setting up any type of print file is fairly easy, however it can be critical if you miss a simple step. When setting up any type of file for print, you want to make sure you have the correct resolution. It's always important when setting up your file for print, to set your resolution to at least 300 DPI. If the document is set to 72 DPI and set to print, your item will be printed with a distorted, blurry image. To see what the difference is between 72 DPI and 300 DPI see the illustration below. Any files sent in at 72 DPI will be rejected and could cause delay.

Common Terms
Proof: When original artwork is uploaded to your account, the artwork is processed for offset printing. An electronic proof is generated. This electronic proof will show lines indicating the bleed (red outer line), trim (blue center line), and caution zone (green inner line). These lines are visual indicators only and will not print on the finished piece.
Press Ready: A file that is ready to upload. A press ready file is high resolution, correctly sized, and in one of the four acceptable file formats (PDF, tiff, jpg or eps).
Bleed: When artwork and/or background colors go to the edge, or “bleed off†the edge of the page. To achieve this, the artwork or background color is created larger than the finished piece. The extra artwork or background is printed and then trimmed down to the correct finished size.
Trim Line: The actual cut line where the paper is Trimmed is the trim line. Paper can shift during the trimming process and the trim line can vary slightly, which makes bleed and caution zone requirements very important.
Caution Zone: Text should be positioned at least 1/8 (.125) inch away from the trim line to ensure the text does not get cut off or end up too close to the edge of the finished piece, should the paper shift during the trimming process.
Art Suspect: Once a file has been sent to press, the art department will review the proof to ensure the piece will produce the best possible final product. If any problems are found, the job will go on hold as art suspect. This will allow the you the opportunity to review the issue, fix the problem and upload a new file, or waive the art suspect status.
Resolution: The resolution, commonly referred to as dpi or dots-per-inch, means the clarity of the image. The higher the dpi the clearer the picture. To achieve a crisp, clear image on the finished product, 300dpi resolution images are required.


